Tuesday 29 June 2010

Tiddly Inks challenge 11 - Red, white and blue!

Goedemorgen! Wat is het warm he! Voor de challenge deze week van Tiddly inks willen deze week graag kaartjes zien met de kleuren combinatie rood, wit blauw. Ik heb op mijn kaartje de afbeelding bathing beauty gebruikt uit de gothic cute collectie van Tiddly Inks. Ik hen de afbeelding zoals altijd gekleurd met potloden en de ogen van de beauty zijn gekleurd met een zwarte glaze pen. Als basis heb ik een donkerblauwe kaart genomen en hierop heb ik rood gestreept papier geplakt om zo een marine look te creëren. De tekst heb ik geprint. en daarna heb ik 4 rondjes gemaakt met de ronde nestabilities. Van rood lint heb ik 3 hele kleine strikjes gemaakt en deze heb ik op de rondjes geplakt. Neem ook eens een kijkje op het Tiddly Inks challenge blog want één gelukkig persoon kan een waardebon voor de Tiddly Inks shop winnen!

Goodmorning! Wow it is really hot over here. This week's challenge from the Tiddly Inks challenge blog is a colour combination, we want to see crads with the colours red, white and blue. I used an image from the Gothic cuties collection on my card: Bathing beauty. As usual I have used my pencils to colour her and the yes of the beauty were coloured with a black glaze pen. My card was made from dark blue cardstock and on top of that I added some red striped paper to create a navy look. The sentiment was printed and then I cut it out with the circle nestabilities. I made 3 little bows from red ribbon and I attached those on the circles. I hope you all can join in the challenge because one lucky person will win a voucher for the Tiddly inks shop.

IMAGE: Bathing beauty from Tiddly inks
CS: Dark blue cs from Wibra
ACCESSORIES: Pencils, black glaze pen, circle nestabilities, red ribbon

Monday 28 June 2010

Hanglar doosje voor Angela


Goedemorgen! Vandaag kan ik eindelijk dit "doosje" laten zien dat ik een tijdje geleden voor mijn vriendin Angela heb gemaakt, want ze heeft mijn pakketje ontvangen. Het is helaas niet zo goed te zien op de foto, maar dit is dus eigenlijk een soort  doosje en daar heb ik stempelafdrukjes van Hanglar ingedaan voor Angela. Het doosje heb ik gemaakt van Strawberry fool cardstock van Elzybells. De maten van het doosje heb ik aangepast aan de maat die de stapel afdrukjes had. Ik heb in sluiting gaatjes gemaakt zodat het doosje gesloten kan worden met het witte lintje. Ik heb het afdrukje gekleurd met derwent potloden en de oogjes heb ik gekleurd met een zwarte glaze pen. Daarna heb ik het meisje uitgeknipt. Met de Labels one nestabilities heb ik het label uitgesneden. Langs de rand heb ik gedoodled met een zwarte fineliner. De bloemetjes zijn gemaakt met de florap punches van Nellie Snellen. Ik heb de bloemetjes bespoten met pearl glimmermist. In het midden van de bloemetjes heb ik een pareltje geplakt.

Goodmorning! Today I finally show you this "box" that I made a while ago for my friend Angela, because she has finally received it. You can't see it very well on the picture, but this is a little box that I made for a couple of stamped images from Hanglar. The box was made from strawberry fool cardstock from Elzybells. I adjusted the size of the box to the size of the stamped images. I made a couple of holes in the box, so it can be closed with the ribbon. I have coloured the image of the girl with derwent pencils and her eyes were coloured with a black glaze pen. I have cut the image out. I used the nestabilities labels one for the label. I doodled on the edge of the label with a black fineliner. The flowers were made with the floral punches from Nellie Snellen. I have sprayed pearl glimmermist on top of them. In the middle of the flowers I added a little pearl.

IMAGE: Hanglar
CS: Strawberry fool and whipped cream cs from Elzybells, green papicolor
INK: Versafine onyx black
ACCESSORIES: Derwent pencils, black glaze pen, black fineliner, floral punches Nellie Snellen, pearls from Kars, white ribbon, labels one nestabilities.

Sunday 27 June 2010

Pocket silhouettes

Hallo! Dit is het tweede kaartje van mij dat deze maand in de Hobbyjournaal is geplaatst. Ik heb met de cirkel nestabilities een gat gemaakt in de voorkant van mijn kaart.Op het binnenblad heb ik de afbeelding gestempeld. Dit is één van de stempels uit de Pocket silhouettes stempelset van Stampin Up. Boven op het takje heb ik een aantal rose bloemetjes geplakt. De bloemetjes heb ik lang geleden bij de Xenos gekocht. Ik heb in het midden van de bloemetjes een rose hotfix steentjes geplakt. Op de voorkant van de kaart heb ik wat streepjes en lijntjes geëmbost met een embossingsjabloon die ik zelf heb gemaakt. Hier overheen heb ik een rose organza lintje geplakt met twee strikjes. Rondom het gat van de nestabilities heb ik een rose radnje geplakt dat ik gemaakt heb met de cirkel nestabilities.

Hello! This is the second card that I made for the Dutch craft magazine Hobbyjournaal for this month. I have used the circle nestabilities to make an aperture in the front of my card. Behind the aperture I have stamped my image. These branches are a stamp from the Pocket Silhouettes stamp set from Stampin Up. On top of the braches I added a couple of flowers that I bought at a Dutch store years ago. I added a pink hotfix stone to the middle of the flowers. On the front of the card I dry embossed a couple of lines with an embossing template that I made myself. I added a pink organze ribbon with 2 bows.

IMAGE: Pocket silhouettes from Stampin Up.
CS: White cs
INK: Vivid vintage green
ACCESSORIES: Flowers from Xenos, hotfix, organza ribbon, circle nestabilities.

Friday 25 June 2010

Softpencil - I will cook for you!


Goedemiddag allemaal, ook deze maand heb ik weer 2 kaartjes voor de nieuwe hobbyjournaal mogen maken en dit is de eerste. Toen ik dit lieve muisje zag in de Softpencil shop moest ik gewoon een kaartje maken met die afbeelding, Wat een lieverd is het! Ik heb de afbeelding gekleurd met derwent potloden en de ogen en neus van de muis zijn gekleurd met een zwarte glaze pen. Na het kleuren heb ik de afbeelding uitgeknipt. Als basis heb ik een donkerblauwe kaar genomen waarop ik het lichtblauwe ruitjes papier heb geplakt. De tekst heb ik geprint op een stukje wit papier en dat heb ik op een donkerblauw vlak papier geplakt. Met een perforator heb ik de twee donkerblauwe rondjes geponst en deze heb ik naast de tekst geplakt. De afbeelding heb ik op een vlak van het lichtblauwe ruitjes papier geplakt. Ik heb langs de randen een stiklijntje getekend met een donkerblauwe fineliner.

Hello everyone, this month I was asked again to make 2 cards for the dutch magazine Hobbyjournaal and this is the first card. When I saw this cute little mouse in the Softpencil shop, I had to make a card with this image. Such a sweetie! I have coloured the image with derwent pencils and the eyes and nose of the mouse were coloured with a black glaze pen. Aftre I coloured the image I cut it out. I used a darkblue card as a base for my card. On top of the card I attached some light blue gingham paper. I printed the sentiment (Let's have dinner together) on white cs and matted it on dark blue paper. I punched two little circles and attached them next to the image. The image was placed on a piece of the gingham paper and with a dark blue fineliner I have drawn the faux stitching on the piece. 

CS: Darkblue papicolor
ACCESSORIES:  Derwent pencils, black glaze pen, dark blue fineliner, perforator

Thursday 24 June 2010

Softpencil - Molly is giving you a flower en Tuesday morning sketchers


Goedemiddag! Vandaag is het alweer de laatste week dat ik guestdesigner ben voor Softpencil. Deze laatste week was het de bedoeling om een scrapbookpagina te maken met Molly is giving you a flower. Ik heb het geprobeerd maar ik ben gewoon géén scrapbooker en het wilde niet echt lukken, daarom heb ik maar een cadeausetje gemaakt met deze afbeelding. Het setje bestaat uit een kaartje en een mapje waarin je een zakje met bloemblaadjeskunt stoppen. Verder heb ik nog een zakje met zaadjes versierd met de afbeelding van Molly.

Hello! Today is allready the last day for me as a guestdesigner for Softpencil. This last week we had to make a scrapbookpage with the image Molly is giving you a flower. I tried to make one, but I found out I am NOT a scrapbooker. So I decided to make a giftset instead of that. The set has a card and a little wallet that will hold a package with flower seeds. I also decorated the bag with the seeds.

Voor mijn kaartje heb ik de sketch van de Tuesday morning sketchers gevolgd. De afbeelding Molly is giving you a flower is geprint op whipped cream cardstock van Elzybells en ik heb Molly ingekleurd met derwent potloden. De afbeelding heb ik uitgesneden met de ovalen nestabilities. Ik heb met een groene fineliner een stiklijntje langs de rand van de ovaal getekend. Het stipjespaper is van Nel van Veen. Ik heb de tekst geprint op een stripje papier en ook hierop heb ik met een groene fineliner stiklijntjes aangebracht. De bloemen zijn gemaakt met de floral punches van Nellie Snellen van purper papicolor papier. Ik heb de bloemen bespoten met pearl glimmermist. In het midden van de bloemen heb ik een zilver hotfix steentje geplakt.

I used the sketh from the Tuesday morning sketchers. The image Molly is giving you a flower was printed on whipped cream cardstock from Elzybells and I coloured Molly with my derwent pencils. The image was cut out with the oval nestabilities. With a green fineliner I have drawn faux stitching on the edge of the oval. The dotted paper is from Nel van Veen. I printed the sentiment on a strip of paper and added the faux stitching. The flowers were made with the floral punches from Nellie Snellen. I sprayed pearl glimmermist on top of them and in the middle of the flowers I added a silver hotfix stone.
Voor het mapje heb ik hetzelfde stipjes papier van Nel van Veen gebruikt. Ik heb de afbeelding van Molly weer op whipped cream cardstock van Elzybells geprint en met het phoebe alfabet heb ik de tekst gemaakt van groen papier. Ook hier heb ik weer een paars bloemetje geponst en deze boven de tekst geplakt. Onder het stipjespapier heb ik een stukje lint geplakt en dit heb ik ook aan de achterkant van het mapje gedaan.
For the wallet I have used the same dotted paper from Nel van Veen. I printed the image Molly again on whipped cream cardstock and I made the sentiment with the phoebe alphabet from quickutz. I punched another flower. Under the dotted paper I attached a piece of ribbon and I did the same thin g on the back of wallet, so the wallet can be closed with a bow.

Dit is de binnenkant van het mapje met aan de ene kant een tekst en aan de andere kant een zakje waarin de een zakje met bloemzaadjes gestopt kan worden.

This is the inside of the wallet with one side a panel with a sentiment and on the other side a pocket that you can use for a bag of flower seeeds.

De tekst heb ik geprint en eromheen heb ik gestempeld met een bloemetjes stempel van de Rubber stamp tapestry. Deze bloemetjes heb ik ook gekleurd met derwent potloden en het midden van de bloemetjes is gekleurd met een zwarte glaze pen.

The sentiment was printed and I stamped around it with a little flowerstamp from Rubber Stamp Tapestry. I coloured the little flowers with a derwent pencil and the middle of the flowers is coloured with a black glaze pen.

Aan de andere kant van het mapje heb ik een zakje geplakt dat ik zelf heb gemaakt van purper papicolor papier. De afbeelding die ik hier heb gebruikt is Flowers for you. Dit lieve konijntje heb ik ingekleurd met derwent potloden en de oogjes zijn gekleurd met een zwarte glaze pen. Ook hier heb ik rondom de afbeelding gestempeld met de bloemetjes stempel van Rubber stamp tapestry.

On the other side of the wallet I added a pocket that you can use for the bag with seeds. I made the pocket from purple papicolor paper. The image I used is Flowers for you. I coloured this sweet little bunny with derwent pencils and his eyes were coloured with a black glaze pen. Again I stamped around the image with a flower stamp from Rubber stamp tapestry


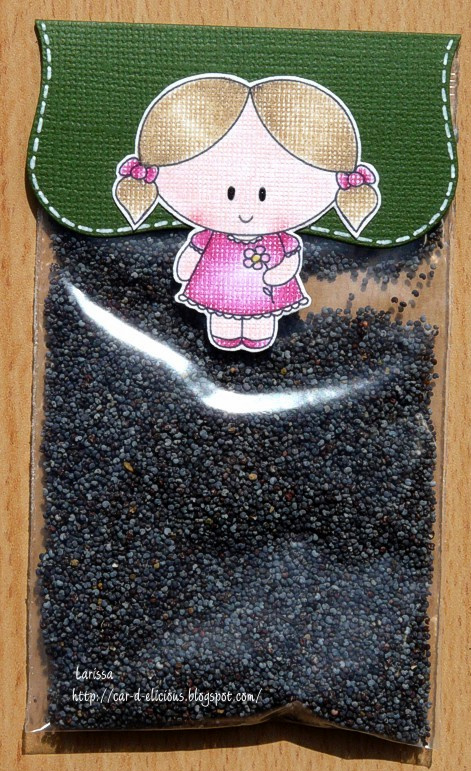
Ik heb wat zaadjes in een plastic zakje gedaan en met de Labels 8 nestabilities heb ik het label gemaakt wat aan de bovenkant van het zakje zit. Ik heb met een witte gelpen een stiklijntje langs de rand getekend. Ik heb Molly nog een keer geprint en na het kleuren heb ik haar uitgeknipt en op het label en zakje geplakt.

I did a couple of seeds in a plastic bag and I used the nestabilities labels 8 to create a label. I used a white gelpen for the faux stitching on the edge of the label. I printed Molly again and after I coloured her, I cut her out and attached her on the bag and label.

IMAGE: Molly is giving you a flower and Flowers for you from Softpencil, Rubber stamp tapestry.
CS: Bazzil ivy, purper papicolor, whipped cream cardstock from Elzybells, dotted paper from Nel van Veen.
INK: Versafine onyx black
ACCESSORIES: Derwent pencils. black glaze pen, white fineliner, green Staedtler fineliner, Oval and labels 8 nestabilities, white ribbon, florap punches Nellie Snellen, silver hotfix, phoebe alphabet from quickutz.

Wednesday 23 June 2010

Tiddly Inks - Dancer


Goedemorgen allemaal! Vandaag een kaartje met één van de nieuwe afbeeldingen uit de Tiddly Inks shop. Ik ben gek op ballerina stempeltjes en ik was dan ook meteen verliefd op deze afbeelding! Ik heb de afbeelding geprint en daarna gekleurd met mijn derwent potloden. De oogjes van de ballerina zijn gekleurd met een zwarte glaze pen en op haar pakje heb ik stipjes getekend met een witte gelpen. De afbeelding is uitgesneden met de ronde nestabilities. Ik heb een maskertje van de afbeelding gemaakt en daarna heb gekleurd met lichtblauwe stempelinkt langs de randen. Op het jurkje en het haarbandje heb ik daarna glitter geplakt. De tekst heb ik geprint en daarna heb ik die uitgesneden met de Stampin Up word window punch. De witte bloemen zijn gemaakt met de floral punches van Nellie Snellen. Ik heb de bloemen allemaal bespoten met pearl glimmermist, zodat ze mooi glinsteren. In het midden van de bloemen heb ik een zwart hotfix steentje geplakt.

Goodmorning everyone! Today I have a card with one of the new images from the Tiddly Inks shop. I love ballet stamps and I fell immediately in love with this cute image! I have printed the image and then I coloured it with my derwent pencils. I used a black glaze pen to colour the eyes of the girl and I used a white gelpen to add dots on to her clothes. The image was cut out with the circle nestabilities. I made a mask from the image and coloured around the image with lightblue ink. I added glitter on to her tutu. The sentiment was printed and I used the stampin up word window punch to punch it out. The white flowers were made with the floral punches from Nellie Snellen. I added pearl glimmermist and now they have a lovely sparkle. I added a black hotfix stone in the middle of the flowers.

IMAGE: Dancer from Tiddly Inks
CS: White cs
ACCESSORIES: Derwent pencils, black glaze pen, white gelpen, floral punches from Nellie Snellen, hotfix

Tuesday 22 June 2010

Tiddly Inks - Buttons and/or lace


Goedemorgen allemaal! Wow de week is weer omgevlogen en dat betekent dat we deze week alweer aan de tiende Tiddly Inks challenge toe zijn. Deze week willen we graag zien dat je knopen en/of kant op je kaartje gebruikt. Het is mij gelukt om beide op mijn kaartje te gebruiken. De afbeelding die ik heb gebruikt is een nieuwe afbeelding en hij heet Somebunny. Ik heb de afbeelding gekleurd met derwent potloden  en rondom de afbeelding heb ik met blauwe chalk gekleurd. De ogen van het meisje en het konijntje zijn gekleurd met een zwarte glaze pen. Ik heb de afbeelding uitgesneden met de ovalen nestabilities. Ik vond tussen mijn moeder's naaispulletjes dit lieve kantje met hartjes en dat heb ik achter de afbeelding geplakt. Het roze cardstock is geëmbost met de polka dots embossing folder van cuttlebug. In de hoekjes heb ik knoopjes geplakt die ook uit mijn moeder's voorraad komen.

Goodmorning everyone! Wow time flies, we are already starting on the 10th Tiddly Inks challenge. This week we want to see buttons and/or lace on your card. I was able to use both on my card. The sweet image I used on my card is a new image and it is called Somebunny. I have coloured the image with my derwent pencils and I used blue chalk to colour around the image. The eyes of the girl and the bunny are coloured with a black glaze pen. I have cut the image out with the oval nestabilities. I found this cute lace with hearts in my mother's stash and I added it behind the oval. The pink cardstock was embossed with the polka dots embossing folder from cuttlebug. In the corners I placed 4 little buttons that I also found in my mother's stash.

IMAGE: Somebunny from Tiddlyinks
CS: Pink cs with linenstructure.
ACCESSORIES: Derwent pencils, black glaze pen, oval nestabilities, white gelpen, lace, buttons, polka dots embossing folder.

Monday 21 June 2010

Cadeau envelopje

Hallo! Zo het weekend is weer over en ik heb even lekker wat anders gedaan. Gisteren ben ik naar de musical Joseph and the amazing technicolor dreamcoat geweest en het was super! Soms was het heel erg grappig, maar er werd vooral mooi gezongen en geweldig gedanst! Het was dus genieten. :)
Dit cadeau envelopje had ik al voor het weekend gemaakt. Ik heb de envelop gemaakt van wit-rood gestipt papier. De stempel heb ik op de Art specially beurs gekocht en die is van hobbyartstamps. Zoals altijd heb ik de stempels gekleurd met derwent potloden. Ik heb de stempel daarna uitgeknipt en gemat op rood papier. Van hetzelfde rode papier heb ik een strip gesneden waarop ik de tekst gestempeld heb. Dit is een stempel van Stamping Bella. De envelop sluit met een stukje klitteband wat onder de afbeelding verstopt zit.


Hello! The weekend is over and I didn't make any cards at all. Yesterday I have been to the musical Joseph and the amazing technicolor dreamcoat and I really enjoyed it! It was funny, but more important the singing was gorgeous and the dancing was fabulous!
I have made this money wallet before the weekend. The wallet was made from white-red dotted paper. The stamp was bought on a dutch craft show and it is from Hobbyartstamps. I used my derwent pencils as always to colour my image. I then cut it out and added some red paper behind it. I have cut a strip from the same red paper and stamped the sentiment (congrats) on it. That stamp is from Stamping Bella. The wallet closes with a piece of velcro that I have hidden behind the image.

IMAGE: Blooming (FL1910E) from Hobbyartstamps, dutch sentiments from Stamoing Bella
CS: Red papicolor
INK: Versafine onyx black
ACCESSORIES: Derwent pencils, velcro

Friday 18 June 2010

DU2DS 40 - Blooms and butterflies & Sassy Cheryl's


Goedemorgen. We zijn alweer toe aan een nieuwe challenge van Dare U 2 Digi Stamp en deze week willen we graag bloemen en vlinders zien op je kaartje. Aangezien ik op mijn kaart ook nog eigengemaakte bloemen heb geplaatst is mijn kaartje ook geschikt voor de challenge van Sassy Cheryl's, want daar willen ze deze week graag eigengemaakte bloemen op je kaartje zien. Ik heb mijn eerste easelcard ooit gemaakt en ik denk dat er wel meer zullen volgen, want wat staat dat leuk zo'n easelcard! De afbeelding die ik op mijn kaart heb gebruikt is van Sasy Cheryl's en Crossed eye butterfly past perfect bij de challenge van DU2DS. Ik heb de afbeelding samen met de tekst geprint en daarna heb ik de afbeelding ingekleurd met mijn potloden. De afbeelding is gemat op donkerblauw papier en ook de easelcard zelf is gemaakt van het donkerblauwe papicolor papier. Ik heb hierop een een veel rose-wit gestreept papier geplakt. De bloem is gemaakt met de floral punches van Nellie Snellen. Ik heb pearl glimmermist op de donkerblauwe bloem gespoten in het midden van de bloem heb ik een rose gestipt knoopje geplakt. Op het onderstuk van de kaart heb ik rose-wit gestipt papier geplakt en daarop heb ik nog een bloem geplakt die kan dienen als stop voor de bovenkant.

Goodmorning! Today we have a new challenge for you on the Dare U 2 Digistamp blog and this week we want to see blooms and butterflies on your card. Because my card has a couple of homemade flowers on it, the card is also perfect for the Sassy Cheryl's challenge, because they want you to make your own flowers. I made my first easelcard ever and they are really fun, so I guess you will be seeing more of these on my blog! The iage I used on my card is from Sassy Cheryl's and crossed eye butterfly was perfect for the DU2DS challenge. I printed the image together with the sentiment and then I coloured the image with my pencils. I added dark blue paper under the image. I used the same darkblue papicolor paper for the base of my card. I added pink-white striped paper. The blue flower was made with the florap punches from Nellie Snellen. I sprayed pearl glimmermist on the flower and added a pink dotted button to the flower. On the bottom of the card I used pink and white dotted paper and again I added a flower.


CS: Papicolor
ACCESSORIES: Pencils, floral punches Nellie Snellen, buttons, pearl glimmermist

Thursday 17 June 2010

Softpencil - Michu's mom.


Hoi hoi, vandaag heb ik weer een Softpencil kaartje voor jullie. Deze week heeft het (guest)designteam een kaartje gemaakt met de afbeelding Michu's mom. Michu is een lief katje en hij woont in een cupcake. :) Ik heb de afbeelding gekleurd met mijn potloden en daarna heb ik een glitterdak op Michu's cupcake gemaakt. Ik hoop dat Michu van rose glitter houdt (is niet echt een jongens kleur LOL). Met een witte gelpen heb ik stipjes op de scallops getekend. Het cupcake papier van doodlebug vond ik perfect bij de afbeelding passen en dat moest ik dan ook gebruiken op mijn kaart! De rose strip van het doodlebug cardstock is geëmbost met de polka dots embossing folder van quickutz. Hieromheen heb ik een wit lintje gebonden. Ik heb met een witte gelpen nog stiklijntjes op de rose strip getekend.

Hi everyone, today I am showing another Softpencil card. This week the (guest)designteam had to work with the image Michu's mom. Michu is a cute little cat and he lives in a cupcake. I have coloured the image with pencils and I gave Michu's cupcake a pink glitter roof. I really hope Michu loves pink glitter, although it is not the favorite colour of many boys. ;) LOL With a white gelpen I added some dots on the scalops of the circle. I thought the doodlebug cupcake paper was a perfect match for this image and so I had to use it on my card. The pink strip doodlebig cardstock was embossed with the polka dots embossing folder from quickutz. I wrapped a white ribbon around it. I also have drawn faux stitching on top of it.

IMAGE: Michu's mom from Softpencil
PAPER: Pink Doodlebug cs, Doodlebug cupcakes paper
ACCESSORIES: Pencils, circle nestabilities, white gelpen, Polka dots embossing folder from quickutz, white ribbon, Pink doodlebug glitter, black glaze pen.

Wednesday 16 June 2010

Woodland bluebells


Goedemorgen! Dit verjaardagskaartje heb ik gisteren gemaakt. De mooie bloemenstempel is van Joanna Sheen. Ik heb de bluebells ingekleurd met luminance potloden en daarna heb ik de afbeelding uitgesneden met de labels one nestabilities. De donkerblauwe kaart komt van de Wibra. Het karton heeft een hele mooie structuur. Ik heb met een witte gelpen stiklijntjes langs de randen van de kaart getekend. Midden over de kaart heb ik een wit lintje geplakt en daar bovenop heb ik 2 kleine strikjes toegevoegd. De tekst is een nederlandse tekststempel van Stamping Bella.

Goodmorning! I made this birthday card yesterday. The lovely flowerstamp is from Joanna Sheen. I have coloured the bluebells with luminance pencils and the image was cut out with the labels one nestabilities. The darkblue card is from a dutch shop. It has a really fabulous structure. I have added faux stitching with a white fineliner. In the middle of the card I attached a white ribbon. I have added two little bows on each side of the image. The sentiment (congrats) is a dutch sentiment stamp from Stamping Bella.

IMAGE: Woodland bluebells from Joanna Sheen, dutch sentiments from Stamping Bella.
CS: Darkblue card from Wibra
INK: Versafine onyx black
ACCESSORIES: Luminance pencils, white gelpen, nestabilities labels one, white ribbon.

Tuesday 15 June 2010

Tiddly Inks 9 - Bleep, bleep boys and their robots

Goedemorgen! Het is weer dinsdag en dat betekent dat het weer tijd is voor een nieuwe Tiddly Inks challenge en deze week draait het om robots. We willen graag kaarten of andere projecten met een robot erop zien. In de Tiddly inks shop kun je een paar leuke robot afbeeldingen vinden.

Goodmorning! It is tuesday again and that means it is time for another Tiddly Inks challenge and this week it is all about robots. We want to see cards or other projects with robots. You can find a couple of really cute robot images in the Tiddly Inks shop.


Ik heb deze week een kaart en cadeau doosje gemaakt voor mijn kleine broertje LOL. Hij is 30 geworden en dat hebben we afgelopen zaterdag gevierd. Voor op zijn kaart heb ik de afbeelding Big bad dad gebruikt. Ik heb de afbeelding geprint en daarna heb ik de robot gekleurd met een zilver stift, dit alleen helaas niet goed te zien op de foto. De rest van de afbeelding is ingekleurd met stiften. Het randje met de moertjes zit in dezelfde set. Op een witte kaart heb ik een zwarte streepjes achtergrond geplakt. Verder heb ik alleen tekst toegevoegd, omdat het een mannenkaart moest worden en dan vind ik teveel versieringen niet passen. :)

I made a card and a little present box this week for my little brother. LOL He celebrated his 30th birthday this past saturday. On his card I used the image Big bad dad. I have printed the image and then I coloured my image with a silver marker, unfortunately you can't see this on my picture. The rest of the image was coloured with markers. The border with the nuts is also from the Big bad dad set. I used a black striped pattern on my white card. The only thing I added was the sentiment (congratulations), because I want to keep the card very simple because it is for a man.


Het cadeautje zat verstopt in een klein doosje. dat ik heb gemaakt van zwart bazzil bling karton. Het is hetzelfde doosje als uit deze post alleen deze keer heb ik er geen theezakjes in gedaan maar op de bodem van het doosje heb ik een vakje gemaakt waarin je het geld kan stoppen. (Voor de oplettende lezer: Ik moest nog pinnen nadat ik de foto's had gemaakt :) ). De afbeelding die ik binnenin heb gebruikt is Roboto. Is het geen schatje met zijn vierkante ballonnetjes? Ook deze robot is weer gekleurd met de zilverstift en gewone stiften. Het vakje is ook gemaakt van het zwarte streepjes papier.

The present was hidden in a little box that I made from black bazzil bling cardstock. It is the same box as in this post. This time I didn't add the tea, but instead of that I made a little pocket on the bottom of the box for some money. (I still had to go to the bank when I made these pictures. :) ) The image I used on the inside of the box is Roboto. Don't you think he is cute with his square balloons? This time again I colored with the silver and normal markers. I made the pocket from the striped paper.


Dit is de bovenkant van het doosje. Ik heb de afbeelding groter uitgeprint dan de maat van de Roboto die in het doosje zit en ook hier heb ik weer gekleurd met de zilverstift. Ik heb de afbeelding uitgeknipt en daarna met foamtape opgeplakt.

This is the top of the box. I have printed the image in a bigger size than the Roboto that is inside the box and again I coloured the image with the silver marker. I have cut the image out and used foamtape to put it on the box.


Op de zijkanten van de deksel heb ik weer het zwarte streepjes papier geplakt en daar bovenop heb ik de naam van mijn broer en zijn leeftijd geplakt. De letters zijn gemaakt van rood glitterpapier met behulp van het moxie alfabet van quickutz.

On the sides of the box I added the striped paper again. I added my brother's name on the sides. The letters were made from red glitter paper with the moxie alphabet from quickutz.


IMAGE: Big bad dad and Roboto from Tiddly inks
CS: Black bazzil bling cs, red glitter paper.
ACCESSORIES: Silver marker, markers, black glaze pen, moxie alphabet from quickutz.

Monday 14 June 2010

Tiddly Inks


Goedemiddag! Vandaag laat ik weer een simpel kaartje zien dat ik heb gemaakt met een Tiddly inks digi stempel. De afbeelding die ik heb gebruikt is Happy day bouquet. Ik heb de bloemen geprint op het whipped cream cardstock van Elzybells. Ik heb eerst de afbeelding gekleurd met potloden en daarna heb ik dewdrops op de bloemetjes geplakt. Het idee heb ik niet van mezelf, maar van Carisa, die dit geweldige kaartje maakte. Rondom de bloemstengel heb ik twee gaatjes geprikt. Hieraan heb ik de tag gehangen die ik met een pons van Martha Stewart heb gemaakt. De afbeelding heb ik uitgesneden met de deckled nestabilities. Op de kaart heb ik met een witte gelpen nog een stiklijntje gemaakt.

Hi everyone! Today I am going to post another very simple card with a Tiddly inks digital stamp. The image I used today is Happy day bouquet. I have printed the flowers on whipped cream cardstock from Elzybells. I have coloured the image with my pencils and then I added a couple of purple dewdrops on the flowers. I saw this great idea on a lovely card from Carisa, you can see it here. I made two little holes next to the stem of the flowers and I attached a little tag with the sentiment (Get well) to it. The image was cut out with the deckled nestabilities. I have added faux stitching on my card with a white fineliner.


IMAGE: Happy day bouquet from Tiddly Inks
CS: Whipped cream cardstock from Elzybells, purple card from kruidvat
ACCESSORIES: Pencils, deckled nestabilities, dewdrops, scalloped tag punch from Martha Stewart, thread, white fineliner.

Sunday 13 June 2010

Tiddly inks - Simpel bloemenkaartje

Goedemiddag allemaal! Vandaag post ik een heel eenvoudig kaartje dat ik een tijdje geleden al gemaakt heb met een freebie van Tiddly Inks. Iedere dinsdag post Christy Croll een freebie in de Tiddly Inks digitals group op Papercraft planet en daar zitten hele leuke afbeeldingen tussen! Je moet wel even lid worden van de groep, maar dat is heel snel geregeld. Ik heb deze afbeelding geprint op een kaart met linnenstructuur en daarna heb ik de inkt laten drogen met de heatgun. Ik heb daarna de afbeelding gekleurd met inkadinks. Dit moest heel voorzichtig gebeuren aangezien de inkt uit mijn printer niet watervast is. Ik heb gekozen voor hele felle kleurtjes, aangezien ik dit goed bij de afbeelding vond passen. In de hartjes van de bloemen heb ik een zilveren hotfixje geplakt. De tekst is geprint op een apart stukje papier en daarna heb ik hem uitgeponst met de Stampin up word window punch. Ik heb de tekst met foamtape boven op de afbeelding geplakt.

Hi everyone! Today I am posting a very simple card that I made with a Tiddly inks freebie image. Every tuesday Christy Croll posts a Tiddly Inks freebie image in the Tiddly Inks digitals group on Papercraft planet and there are really awesome images! You have to become a member from the group, but that is pretty easy! I have printed my image direct on a card with linen structure and then I used the heatgun to dry the ink. I have colored the image with inkadinks. I had to be really careful because my printer ink isn't waterproof. I have chosen for really bright colours, because I thought they were perfect for the image. I added 3 silver hotfix stones in the middle of the flowers. I printed the sentiment (Happy birthday) on a seperate piece of paper and punched it with the Stampin up word window punch. I used foamtape to attach the sentiment on the card.

IMAGE: Three for you freebie from Tiddly Inks
CS: White cs with linenstructure
ACCESSORIES: Inkadinks, silver hotfix, stampin up word window punch.

Friday 11 June 2010

Sassy Cheryl's challenge - Embossing

Goedemiddag allemaal. Ik had nog een geslaagd kaartje nodig en gelukkig kwam ik deze hele vrolijke meid tegen ergens in blogland. Het is een digitale stempel van Sassy Cheryl's digi stamps en de afbeelding heet frantic graduate. Ik heb er maar meteen een kaartje van gemaakt voor het challenge blog van Sassy Cheryl's en deze week is het de bedoeling om embossing op je kaartje te gebruiken. Ik heb weer een stepcard gemaakt, ze zien er zo leuk uit! Ik heb mijn afbeelding geprint op het whipped cream cardstock van Elzybells en daarna is de afbeelding ingekleurd met potloden. De verdere versiering van de kaart heb ik heel simpel gehouden. Ik heb twee strips strawberry fool cardstock van Elzybells gebruikt en deze zijn geëmbost met de swiss dots embossing folder van cuttlebug. Hieromheen heb ik twee kleine stukjes lint geknoopt. De tekst geslaagd is gemaakt met het phoebe alfabet van quickutz. De tekst gefeliciteerd heb ik geprint op een klein stukje papier.

Hi everyone. I needed another graduation card and when I was surfing on the internet I came across this really happy girl. It is a digital stamp from Sassy Cheryl's digi stamps and this image is Frantic graduate. I used the image to make a card for the Sassy Cheryl's challenge blog and this week you have to use embossing on your card. I made another stepcard, they are so fun and easy! I have printed the image on whipped cream cardstock from Elzybells and colored it with pencils. I kept my card very simple. I have cut 2 strips from the strawberry fool cardstock from Elzybells and embossed them with the swiss dots embossing folder. I added 2 pieces of ribbon. The sentiment (graduated) was made with the phoebe alphabet from quickutz. The other sentiment was printed on the whipped cream cardstock.

IMAGE: Frantic graduate from Sassy Cheryl's digi stampsCS: Whipped cream and strawberry fool from Elzybells
ACCESSORIES: Pencils, swiss dots embossing folder from cuttlebug, ribbon, phoebe alphabet from quickutz.

Thursday 10 June 2010

Softpencil - Ratiny's mushroom home

Hallo! Vandaag kan ik jullie alweer mijn tweede project laten zien dat ik heb gemaakt als guestdesigner voor Softpencil. Deze week kregen we de opdracht om te werken met de schattige afbeelding Ratiny's mushroom home en dan was er ook nog een extra opdracht, want je mag geen kaartje maken, maar het moest iets anders worden. Ik heb deze deurhangers al een hele tijd geleden besteld bij Elzybells en het leek me leuk om hier iets mee te maken. Met behulp van een sticky stencil van Crealies heb ik met rode inkt en een distress tool de stippen aangebracht op de deurhanger. Ik heb de afbeelding geprint en daarna ingekleurd met potloden. Ik heb de afbeelding uitgeknipt en met foamtape op de deurhanger geplakt. Het groene draad heb ik bij de action gekocht. Ik heb het om de deurhanger geknoopt. Onder de afbeelding heb ik een strip dubbelzijdig tape geplakt en daar heb ik 3 stukjes van het groene touw op geplakt. Met het Olivia alfabet van quickutz heb ik de naam Nadine gemaakt en deze is onder het touw geplakt. Uit rood parelmoer papier heb ik een paar bloemen geponst met de retro bloemen ponsen. In het midden van de bloemetjes heb ik een zwart hotfix steentje geplakt.


Hello! Today I am showing my second project that I made as a guestdesigner for Softpencil. This week we had to make a project with the very cute image Ratiny's mushroom home and we got another challenge. We weren't allowed to make a card, but it has to be something else. I have bought these door hangers a while ago from the Elzybells store and I thought it would be fun to decorate it. I have used a sticky stencil from Crealies, red ink and a distress tool to create the dots on the doorhanger. I have printed the image Ratiny's mushroom home and colored it with pencils. I cut it out and used foamtape to adhere it on the door hanger. I bought the green cord in a dutch store. The name Nadine was made with the Olivia alphabet from Quickutz. I used the retro punches for the flowers and in the middle of the flowers I added a black hotfix stone.

IMAGE: Ratiny's mushroom home from Softpencil
CS: Door hanger from Elzybells
INK: Memento Ladybug
ACCESSORIES: Derwent pencils, black glaze pen, sticky stencil Crealies, distress tool, green cord, retro flower punches, black hotfix.

Tuesday 8 June 2010

Tiddly Inks 8 - Baby of mine


Goedemorgen allemaal! Wat vliegt de tijd toch! Er is alweer een week voorbij en we zijn alweer aan de 8e challenge toe van Tiddly Inks. Deze week hebben we een challenge die mij wel ligt: Baby of mine. Je moet dus een babykaartje maken. Ik heb er meteen 2 gemaakt, één voor een meisje en de ander is natuurlijk voor een jongetje. De afbeelding die ik heb gebruikt is Sleep tight en die kan je hier vinden in de Tiddly Inks digitals shop. Ik heb de afbeelding gekleurd met mijn derwent potloden en daarna heb ik de afbeelding uitgekninpt. Het rose en blauwe achtergrond papier is van Pink Petticoat en het komt uit de washed out collectie. Ik heb met een zwarte fineliner een stiklijntje langs de randen getekend. Met behulp van de silhouette heb ik de wolkjes uitgesneden. Op de grootste wolk is de tekst geprint. Met een zwarte fineliner heb ik stiklijntjes langs de randen van alle wolken gezet. De wolken zijn geëmbost met de swiss dots embossing folder van cuttlebug. Op alle wolkjes heb ik ook nog pearl glimmermist aangebracht, maar dat is helaas niet te zien op de foto's.


Goodmorning everyone! Wow time is flying! Another week has gone by and we are already starting on the 8th Tiddly Inks challenge. I really like this weeks challenge, because it is: Baby of mine. We want you to make a babycard. I made 2 baby cards, one for a girl and the other one is for a boy. The image I used is Sleep tight and you can find it here in the Tiddly Inks digitals shop. I have coloured the image with my derwent pencils and then I cut it out. The pink and blue background paper is a download from Pink Petticoat from the Washed out collection. I used a black fineliner for the faux stitching on the edges. I made the clouds with the silhouette. I printed the sentiment (hurray a girl/boy) on the largest cloud. I embossed all the clouds with the swiss dots embossing folder from cuttlebug. I have used pearl glimmermist on all the clouds, but you can't see that on my picture.

IMAGE: Sleep tight from Tiddly Inks.
PAPER: Washed out from Pink Petticoat.
ACCESSORIES: Derwent pencils, black fineliner, pearl glimmermist, silhouette, swiss dots embossing folder from cuttlebug.

Monday 7 June 2010

Sketch Saturday 106 en Anyone for Anya met grad Anya


Goedemiddag allemaal! Gisteren heb ik dit kaartje gemaakt voor 2 challenges. Ik heb de leuke sketch van Sketch saturday gebruikt en bij Anyone for Anya is het thema Hot, hot, hot! Je mag zelf weten hoe je het interpreteert, je kunt bijvoorbeeld lekker felle kleuren gebruiken en dat is wat ik gedaan heb. De afbeelding die ik op mijn kaart heb gebruikt is Grad Anya en ik heb de afbeelding gekleurd met mijn derwent en koh-i-noor potloden. De afbeelding is uitgesneden met de cirkel nestabilities en ik heb langs de rand gedoodled met een zwarte fineliner. Op mijn kaart heb ik streepjespapier gebruikt in een hele felle oranje kleur. Hieroverheen heb ik een strip zwart papier geplakt. De tekst is geprint en daarna uitgesneden met mijn nestabilities. Ook hier heb ik langs de rand gedoodled met de zwarte fineliner. Ik heb de kaart verder nog versierd met zwarte hotfix steentjes.

Good afternoon everyone! Yesterday I made this card for 2 challenges. I used the great sketch from the Sketch Saturday blog and Anyone for Anya wants Hot, hot, hot. You can decide for yourself what you are going to do with this theme and I decided to use a very bright colour on my card. The image I used on my card is Grad Anya and I colored her with derwent and koh-i-noor pencils The image was cut out with the circle nestabilities and I doodled on the edge of the circle with a black fineliner. I hvae used striped patterned paper on my paper in a very bright colour: orange. I places a strip black paper on top of it. The sentiment was printed and then I cut it out with the circle nestabilities. I doodled again on the edge of the circle. I decorated the card with a couple of hotfix stones.

CS: White cs, black papicolor
ACCESSORIES: Derwent and koh-i-noor pencils, black fineliner, circle nestabilities, black hotfix.

Sunday 6 June 2010

Geslaagd met Penny Black!


Goedemiddag allemaal! Afgelopen week heb ik dit kaartje gemaakt voor als de eindexamen uitslagen eraan komen. De stempel die ik heb gebruikt is van Penny Black: A scholar. Zoals altijd heb ik gekleurd met mijn potloden. De afbeelding heb ik uitgesneden met mijn rechthoekige nestabilities. Onder de afbeelding heb ik een stukje zwart-wit gestreept papier geplakt waarop ik vierkante hotfix steentjes heb geplakt. Aan de zijkant van de kaart heb ik twee gaatjes gemaakt en daar heb ik het touw doorheen gebonden. De tekst komt uit hetzelfde stempelsetje en die is met foamtape verhoogd boven de toutjes geplakt.

Good afternoon everyone! Last week I have made this card for graduation period. The stamp I used is from Penny Black: A scholar. As always I have colored the image with my pencils. The image was cut out with my nestabilities. I have added a piece of black and white striped paper under the image and I places some square hotfix stones on top of it. I have made two little holes in the side of my card for the thread. The sentiment is from the same stampset and I used foamtape to mount it on my card.

IMAGE: A scholar from Penny Black
CS: Red cards from Kruidvat, black papicolor
INK: Versafine onyx black
ACCESSORIES: Derwent pencils, rectangle nestabilities, hotfix, black thread, white gelpen.

Friday 4 June 2010

DU2DS 39 - Red white and blue (world cup)


Goedemiddag allemaal. Hier is eindelijk mijn kaartje voor de nieuwste DU2DS challenge deze week. Ik was bezig met een ander kaartje, maar het wilde maar niet leuk worden, dus die ligt nu in de prullebak. :) Gisteravond kreeg ik toch inspiratie en hier is dan mijn kaartje voor de challenge van deze week. Deze week heeft Donna de challenge gekozen en die heeft te maken met het WK voetbal. We willen graag kaartjes zien met de kleurencombinatie rood, wit en blauw (van de Nederlandse en Engelse vlag). Ik heb nog overwogen om een kaartje in het oranje te maken aangezien dat toch meer onze kleur is voor het WK voetbal, maar aangezien ik toch niks met het voetbal thema heb gedaan, heb ik maar gewoon de kleuren rood wit en blauw gebruikt. De afbeelding die ik heb gebruikt is Lifesaver van Eline Pellinkhof. Je kunt deze en nog veel meer andere afbeeldingen van Eline kopen bij Squigglefly. Ik heb de afbeelding gekleurd met mijn potloden en daarna heb ik de afbeelding uitgeknipt. Ik heb de afbeelding met foamtape op een donkerblauwe kaart geplakt. Ik heb 4 strips gesneden van rood wit gestreept papier en deze heb ik op de kaart geplakt. Met een blauwe fineliner heb ik stiklijnen getekend. De bootje zijn gestempeld en komen uit een setje met babystempels van Eline Pellinkhof. Ook deze zijn gekleurd met mijn potloden en daarna zijn ook deze uitgeknipt. Ik heb met een witte gelpen stipjes getekend op de zeilen. De tekst heb ik geprint en daarna geponst met de word window punch van Stampin up.

Hi everyone! Here is finally my card for the new challenge from DU2DS this week. I started on another card, but I didn't like it at all, so I threw it in the bin and started on a new card yesterday evening. I just finished my card and now I am able to post it. Donna has chosen the challenge for this week and she was inspired by the worldcup soccer. Our challenge this week is a color combination: we want to see red, white and blue on your cards ( the colours of the Dutch and Brittish flag). I have thought about making a card with orange on it, because when I think about the worldcup  that is the colour that comes into my mind, but I decided to stick to red, white and blue, because I wasn't going to make a card with a soccer theme. The image I used is lifesaver from Eline Pellinkhof. You can buy this image and a lot of other cute digital stamps from Eline Pellinkhof at Squigglefly. I have colored the image with my pencils and then I cut it out. I used foamtape to mount the image on my darkblue card. I have cut 4 strips from the red-white striped patterned paper and used a blue fineliner to draw the faux stitching on them. The little boats are stamps from a baby themed stamp set from Eline Pellinkhof. I colored them with my pencils and cut them all out. I used a white gelpen to draw the dots on the sail. The sentiment was computergenerated and I punched it with the Stampin Up word window punch.

IMAGE: Lifesaver from Eline Pellinkhof at Squigglefly, EC0084 from Marianne design.
CS: Darkblue cards from Wibra
INK:Versafine onyx black
ACCESSORIES: Derwent pencils, white gelpen, blue fineliner, Word window punch from Stampin up.

Thursday 3 June 2010

Softpencil - My new tiny friends

Goedemiddag allemaal! Vandaag post ik mijn eerste kaartje dat ik als guestdesigner voor Softpencil heb gemaakt. Deze week moesten alle Dt-leden een kaartje maken met deze lieve afbeelding: My new tiny friends. Ik heb de afbeelding geprint op linnen papier en daarna heb ik de afbeelding gekleurd met mijn derwent potloden. De ogen van het meisje en alle kuikentjes zijn gekleurd met een zwarte glaze pen. Ik heb de afbeelding uitgesneden met de ovalen nestabilities. Met een zwarte fineliner heb ik een stiklijntje langs de rand van de ovaal getekend. Het zonnetje heb ik op een apart papiertje geprint en deze heb ik uitgeknipt na het kleuren. Ik heb de zon met een stukje foamtape op de kaart geplakt. Als basis heb ik een gele kaart van linnenkarton genomen en daar heb ik de tekst op geprint. Op een wit vlak cardstock heb ik bloemetjes gestempeld met een stempelset van Forever friends. De bloemetjes heb ik ingekleurd met een geel potlood en het midden van de bloem heb ik gekleurd met de zwarte glaze pen. Langs de randen heb ik een stiklijntje gemaakt met een zwarte fineliner. Ik heb in de afbeelding een sneetje gemaakt met een pons en daar heb ik een geel grosgrain lintje doorheen gedaan. Omdat het lintje een beetje saai was heb ik hem versierd met zwarte hotfix steentjes.

Hi everyone! Today I am posting my first card as a guestdesigner for Softpencil. This week all the Dt-members had to make a card with the image: My new tiny friends. I printed my image on paper with linen structure and colored it with my derwent pencils. The eyes from the girl and from all the chicks have been colored with a black glaze pen. I have cut the image out with the oval nestabilities. I used a black fineliner for the faux stitching on the edge of the oval. The sun was printed on a seperate piece of paper and after I colored it, I cut it out. I used a piece of foamtape to attach it on the card. I used a yellow linen card as my base and printed my sentiment on it. I have stamped the little flower from a forever friends stamp set on a piece of white paper and colored them with my yellow pencil. The middle of the flowers were colored with the black glaze pen. Again I used a fineliner for the faux stitching on the edge of the rectangle. I used a punch to make a slit in the oval and I added a yellow grosgrain ribbon. I thought the ribbon was a bit to plain, so I decorated it with little black hotfix stones.

IMAGE: My new tiny friends from Softpencil, All loved up from Forever friends.
CS: Yellow and white linen structure cs
INK: Versafine onyx black
ACCESSORIES: Derwent pencils, black glaze pen, oval nestabilities, black fineliner, yellow grosgrain ribbon, black hotfix, slit punch.

Wednesday 2 June 2010

Tiddly Inks petite Q and exciting news

Goedemorgen allemaal! Dit kaartje heb ik gisteravond gemaakt met één van de nieuwste afbeeldingen uit de Tiddly Inks shop: Petite Q en is ze niet lief? Ik heb de afbeelding geprint en daaronder heb ik ook meteen de tekst geprint. De afbeelding is ingekleurd met derwent potloden. De ogen van de prinses zijn gekleurd met een zwarte glaze pen. Het witte gedeelte van de jurk is gekleurd met moonlight smooch, om het een beetje een koninklijk tintje te geven. De smooch geeft een mooie subtiele glans. De afbeelding is uitgesneden met de ovalen nestabilities. Met kristallen hotfix steentjes heb ik het prinsesje een echte bling bling kroon gegeven en ook haar jurk is nog extra versierd. Ook langs de rand van de ovaal heb ik wat grotere kristallen hotfix steentjes geplakt. Het rose papier op de achtergrond is Bazzil bling cardstock en het geeft een mooie subtiele glans. Ik heb het geëmbost met de diamonds and dots embossing folder van quickutz. Ik heb verder alleen een wit strikje toegevoegd zodat het prinsesje goed opvalt.

Goodmorning everyone! I made this card yesterday evening with one of the newest images from the Tiddly Inks shop. This is petite Q and isn't she adorable? I have printed the images and printed the sentiment directly under it. I have colored the princess with my derwent pencils. The eyes are colored with a black glaze pen. The white part of the dress was colored with moonlight smooch to give it a royal look. The smooch gives a really lovely sparkle. The image was cut out with the oval nestabilities. I used chrystal hotfix stones to give the princess a real sprakly crown and I also decorated her dress with them. I also added a couple of chrystals on the edge of the oval. The pink/red background paper is Bazzil bling and I love the subtle shimmer of the paper. I embossed it with the diamonds and dots embossing folder from quickutz. I only used a white ribbon to decorate my card.


En dan nu mijn nieuws: In de maand juni ben ik guestdesigner bij Softpencil! Ik hou van Elizabeth's lieve afbeeldingen dus ik was erg blij dat ze me heeft gevraagd als guest designer. Morgen laat ik mijn eerste kaart zien, dus hopelijk zie ik jullie morgen!

And now my news: In the month June I am a guestdesigner for Softpencil! I love Elizbeth's sweet images, so I was very happy when she asked me to be a guestdesigner for her! Thank you Elizabeth! Tomorrow you can see my first card and I hope to see you all again! :)

Tuesday 1 June 2010

Tiddly Inks 7 - Going goth!

Goedemorgen allemaal! We zijn vandaag alweer toe aan de 7e challenge van Tiddly Inks en deze week was het een echte challenge voor me. Deze week willen we graag een gothic kaartje zien. In de Tiddly Inks shop staan hele leuke cute gothic stempels dus de afbeelding uitzoeken was niet echt moeilijk. :) Ik heb gekozen voor Happy couple en zoals altijd heb ik gekleurd met mijn derwent potloden. De kleuren heb ik expres een beetje flets gelaten. Ik heb de afbeelding uitgesneden met de labels one nestabilities. Rondom de afbeelding heb ik swirls gestempeld en met grijs krijt heb ik de randen bewerkt. De ogen van het bruidspaar zijn gekleurd met een zwarte glaze pen en de jurk van de bruid is helemaal gekleurd met een clear spica glitter pen. Het zwarte papier is Co'ordinations papier, de kern is lichtpaars. Ik heb het geëmbost met de swiss dots embossing folder en daarna heb ik het papier bewerkt met een schuurpapiertje. De randen  van het zwarte papier zijn gedistressed. Ik had nog een klein stripje van het zwarte co'ordinations papier over en daar heb ik de paarse achterkant van gebruikt. Ik heb hierop met een zwarte fineliner de streepjesachtergrond getekend. De bloemen zijn geponst met de retro ponsen. De grote zwarte bloemen zijn ook geëmbost met de swiss dots embossing folder en op de kleine bloemtjes heb ik met de zwarte glaze pen stippen gezet. In het midden van de bloemetjes heb ik een vierkant hotfix steentje geplakt.

Vergeet niet dat je vandaag alle afbeeldingen in de Tiddly Inks shop kunt kopen met 30% korting. Er zijn naast hele leuke gothic afbeeldingen ook heel veel andere schattige leuke digitale stempels te koop!

Goodmorning everyone! Today we are starting on the 7th Tiddly Inks challenge and this week it was a real challenge. This week we want to see gothic cards. In the Tiddly Inks shop you can find a lot of cute gothic images so picking an image wasn't really hard! :) I have chosen the Happy couple and as always I coloured them with my derwent pencils. I didn't use very bright colors. I used the nestabilities labels one to cut the image out. On the edges of the label I stamped a couple of swirls and I went over the edges with grey chalk. The eyes of the couple are colored with a black glaze pen and I coloured the whole dress of the girl with a clear spica glitter pen. The black paper is Co'ordinations paper, the inside of it is light purple. I embossed it with the swiss dots embossing folder and then I sanded the dots. The edges of the black paper are distressed. I had a leftover strip of the black paper and I used the purple back of the paper. With a black fineliner I have drawn some lines on it. The flowers are made with the retro punches. The large black ones are embossed with the swiss dots embossing folder. I used the black glaze pen to draw dots on the little purple ones. In the middle of the flowers I used a black hotfix stone.

Please don't forget the sale at the Tiddly Inks shop today! You get a 30% discount on all the images!!

IMAGE: Happy couple from Tiddly Inks, Gracias, merci, grazie from Fiskars
CS: Co'ordinations paper.
INK: Versafine onyx black
ACCESSORIES: Derwent pencils, black glaze pen, grey chalk, nestabilities labels one, retro flower punches, black fineliner, hotfix stone, distress tool.

LinkWithin

Related Posts with Thumbnails